
点击“终码一生”,关注,置顶公众号
每日技术干货,第一时间送达!
如何通过 Bucket4j 为您的项目提供基于令牌桶算法的速率限制?
时不时地,我们所有人都面临着限制我们的外部 API 的问题——出于多种原因,我们应该限制对我们 API 的调用的某些功能。
1
-
欺诈检测(保护机器人):例如,我们有一个论坛,当有人试图发送消息或发布超出限制的帖子时,我们希望防止来自客户的垃圾邮件。为了我们自己的安全,我们必须防止这种行为。
-
从业务逻辑来看,通常是用来实现“API业务模型”的:比如我们需要为我们的外部API引入关税功能,我们要创建一些关税,例如START、STANDARD、BUSINESS . 对于每种资费,我们设置了每小时的通话次数限制(但您也可以将通话次数限制为每分钟、每秒、毫秒一次,也可以设置为每分钟一次。此外,您甚至可以设置多个限制限制 – 这称为“带宽管理”)。
-
START – 每小时最多 100 个电话
-
标准 – 每小时最多 10000 个
-
商业 – 高达每小时 100000
在我们的项目中使用速率限制还有很多其他原因。
为了实现限速,我们可以使用很多流行的算法,如下所示。
最受欢迎的:
-
令牌桶
-
漏桶
最不受欢迎的:
-
固定窗口计数器
-
滑动窗口日志
-
滑动窗口计数器
在本文中,我们将讨论“令牌桶”算法。
2
让我们在下一个例子中考虑这个算法。

-
Bucket:如你所见,他的token数量是固定的(如果你在我们的bucket中设置了1000个token,这就是volume的最大值)。
-
Refiller:根据带宽管理定期将丢失的token填充到Bucket(每次Consume前调用)。
-
Consume:从我们的Bucket中取出tokens(取出1个token或多个token——通常取决于调用consume方法的权重,它是一个可定制且灵活的变量,但在99%的情况下,我们只需要消费一个令牌)。
下面,您可以看到一个使用带宽管理以每分钟刷新令牌的填充器示例:
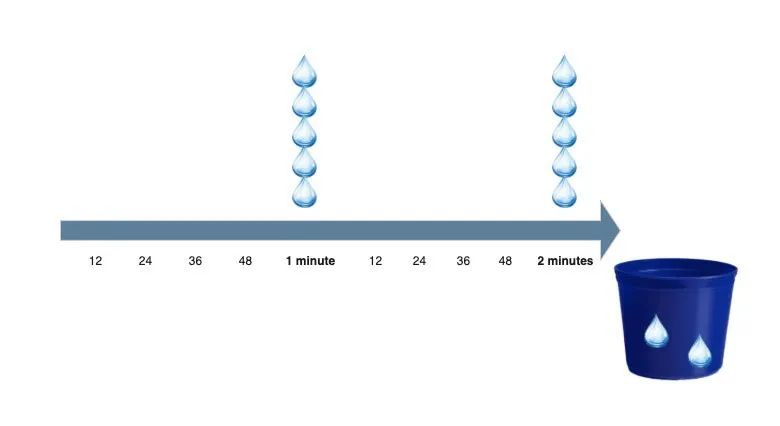
加油机与带宽管理一起工作。消费(作为行动)从桶中拿走代币。
存储桶用于存储当前的令牌计数、最大可能的令牌计数以及生成新令牌的刷新时间。
Token Bucket 算法有固定的内存用于存储 Bucket,它由以下变量组成:
-
Bucket 的体积(最大可能的令牌数) – 8 个字节
-
桶中令牌的当前计数 – 8 个字节
-
生成新令牌的纳秒计数 – 8 个字节
-
对象头:16字节
总共:40 字节
例如,在 1 GB 中,我们可以存储 2500 万个桶。了解这一点非常重要,因为通常我们会将有关存储桶的信息存储在缓存中,然后存储到 RAM(随机存取存储器)中。
3
不幸的是,该算法并不完美。Token Bucket 算法的主要问题被称为“Burst”。
我将用一个完美的例子来说明这个问题,以简短地解释这个想法:
-
在某些时候,我们的存储桶包含 100 个令牌。
-
同时,我们消耗了 100 个代币。
-
一秒钟后,填充器再次填充 100 个令牌。
-
同时,我们消耗了 100 个代币。
大约 1 秒,我们消耗了 200 个代币,因此,我们超过了限制 x2 倍!
但是,有问题吗?没有!如果我们要使用 Bucket 进行长期距离,问题就不是问题了。
如果我们只使用我们的 Bucket 1 秒,我们会过度消耗令牌 x2 倍(200 个令牌),但是如果我们使用我们的 Bucket 60 秒,则该桶的消耗大约等于 6100 秒,因为 Burst 问题只发生了一次. 您使用铲斗的次数越多,其准确性就越好。当准确性在速率限制中很重要时,这是一种非常罕见的情况。
最重要的是消耗内存,因为我们有一个与“Burst”相关的问题。一个bucket有固定内存大小的要求(在Token Bucket算法的情况下 – 40字节),我们面临“Burst”的问题,因为要创建Bucket 我们需要 2 个变量:生成新令牌的纳秒计数(refill)和 bucket 的体积(容量)——因此,我们无法实现 Token Bucket 的准确性合约。
4
让我们考虑一下 Bucket4j 库实现的 Token Bucket 算法。
Bucket4j 是 Java 世界中用于实现速率限制功能的最流行的库。每个月,Bucket4j 从 Maven Central 下载多达 200,000 次,并包含在 GitHub 上的 3500 个依赖项中。
让我们考虑几个简单的例子(我们将使用 Maven 作为软件项目管理和理解工具)。
对于第一个,我们需要在 pom.xml 中添加一个依赖项:
<dependency>
   <groupId>com.github.vladimir-bukhtoyarov</groupId>
   <artifactId>bucket4j-core</artifactId>
   <version>7.0.0</version>
</dependency>
创建 Example.java:
import io.github.bucket4j.Bandwidth;
import io.github.bucket4j.Bucket;
import io.github.bucket4j.Bucket4j;
import io.github.bucket4j.ConsumptionProbe;
import java.time.Duration;

public class Example {

   public static void main(String args[]) {

       //Create the Bandwidth to set the rule - one token per minute
       Bandwidth oneCosumePerMinuteLimit = Bandwidth.simple(1, Duration.ofMinutes(1));

       //Create the Bucket and set the Bandwidth which we created above
       Bucket bucket = Bucket.builder()
                               .addLimit(oneCosumePerMinuteLimit)
                               .build();

       //Call method tryConsume to set count of Tokens to take from the Bucket,
       //returns boolean, if true - consume successful and the Bucket had enough Tokens inside Bucket to execute method tryConsume
       System.out.println(bucket.tryConsume(1)); //return true

       //Call method tryConsumeAndReturnRemaining and set count of Tokens to take from the Bucket
       //Returns ConsumptionProbe, which include much more information than tryConsume, such as the
       //isConsumed - is method consume successful performed or not, if true - is successful
       //getRemainingTokens - count of remaining Tokens
       //getNanosToWaitForRefill - Time in nanoseconds to refill Tokens in our Bucket
       ConsumptionProbe consumptionProbe = bucket.tryConsumeAndReturnRemaining(1);
       System.out.println(consumptionProbe.isConsumed()); //return false since we have already called method tryConsume, but Bandwidth has a limit with rule - one token per one minute
       System.out.println(consumptionProbe.getRemainingTokens()); //return 0, since we have already consumed all of the Tokens
       System.out.println(consumptionProbe.getNanosToWaitForRefill()); //Return around 60000000000 nanoseconds
   }
好的,我认为它看起来简单易懂!
让我们考虑一个更困难的例子。让我们想象一种情况,您需要考虑通过对某个 RESTful API 方法的请求计数来限制(需要通过来自某个用户对某个控制器的请求调用计数来限制,每个 Y 周期不超过 X 次)。但是,我们的系统是分布式的,我们在一个集群中有很多笔记;我们使用 Hazelcast(但它可以是任何 JSR107 缓存、DynamoDB、Redis 或其他东西)。
让我们基于 Spring 框架来实现我们的示例。
首先,我们需要在 pom.xml 中添加一些依赖项:
<dependency>
   <groupId>com.github.vladimir-bukhtoyarov</groupId>
   <artifactId>bucket4j-hazelcast</artifactId>
   <version>7.0.0</version>
</dependency>

<dependency>
   <groupId>javax.cache</groupId>
   <artifactId>cache-api</artifactId>
   <version>1.0.0</version>
</dependency>

<dependency>
   <groupId>com.hazelcast</groupId>
   <artifactId>hazelcast</artifactId>
   <version>4.0.2</version>
</dependency>

<dependency>
   <groupId>org.projectlombok</groupId>
   <artifactId>lombok</artifactId>
   <version>1.18.20</version>
   <scope>provided</scope>
</dependency>
对于下一步,我们应该考虑在将来在控制器级别上使用注释:
@Retention(RetentionPolicy.RUNTIME)
@Target(ElementType.METHOD)
@Documented
public @interface RateLimiter {

   TimeUnit timeUnit() default TimeUnit.MINUTES;

   long timeValue();

   long restriction();

}
此外,注释将分组 RateLimiter 注释(如果我们需要为每个控制器使用多个带宽)。
import java.lang.annotation.*;

@Retention(RetentionPolicy.RUNTIME)
@Target(ElementType.METHOD)
@Documented
public @interface RateLimiters {

   RateLimiter[] value();

}
另外,需要添加新的数据类型:
public enum TimeUnit {
   MINUTES, HOURS
}
而且,现在,我们需要创建一个类,它将进行注释处理。由于将在控制器级别设置注释,因此该类应从 HandlerInterceptorAdapter 扩展:
public class RateLimiterAnnotationHandlerInterceptorAdapter extends HandlerInterceptorAdapter {

   //You should have already realized class, which returns Authentication context to getting userId
   private AuthenticationUtil authenticationUtil;

   private final ProxyManager<RateLimiterKey> proxyManager;

   @Autowired
   public RateLimiterAnnotationHandlerInterceptorAdapter(AuthenticationUtil authenticationUtil, HazelcastInstance hazelcastInstance) {
       this.authenticationUtil = authenticationUtil;

       //To start work with Hazelcast, you also should create HazelcastInstance bean
       IMap<RateLimiterKey, byte[]> bucketsMap = hazelcastInstance.getMap(HazelcastFrontConfiguration.RATE_LIMITER_BUCKET);
       proxyManager = new HazelcastProxyManager<>(bucketsMap);
   }


   @Override
   public boolean preHandle(HttpServletRequest request,
                            HttpServletResponse response,
                            Object handler) throws Exception {

       if (handler instanceof HandlerMethod) {
           HandlerMethod handlerMethod = (HandlerMethod) handler;

           //if into handlerMethod is present RateLimiter or RateLimiters annotation, we get it, if not, we get empty Optional
           Optional<List<RateLimiter>> rateLimiters = RateLimiterUtils.getRateLimiters(handlerMethod);

           if (rateLimiters.isPresent()) {
               //Get path from RequestMapping annotation(respectively we can get annotations such: GetMapping, PostMapping, PutMapping, DeleteMapping, because all of than annotations are extended from RequestMapping)
               RequestMapping requestMapping = handlerMethod.getMethodAnnotation(RequestMapping.class);

               //To get unique key we use bundle of 2-x values: path from RequestMapping and user id
               RateLimiterKey key = new RateLimiterKey(authenticationUtil.getPersonId(), requestMapping.value());

               //Further we set key in proxy to get Bucket from cache or create a new Bucket
               Bucket bucket = proxyManager.builder().build(key, () -> RateLimiterUtils.rateLimiterAnnotationsToBucketConfiguration(rateLimiters.get()));

               //Try to consume token, if we don’t do that, we return 429 HTTP code
               if (!bucket.tryConsume(1)) {
                   response.setStatus(429);
                   return false;
               }
           }
       }
       return true;
   }
要使用 Hazelcast,我们需要创建一个必须可序列化的自定义键:
@Data
@AllArgsConstructor
public class RateLimiterKey implements Serializable {
   private String userId;
   private String[] uri;
}
此外,不要忘记名为 RateLimiterUtils 的特殊实用程序类,用于与 RateLimiterAnnotationHandlerInterceptorAdapter 一起工作(Spring 名称约定样式 – 将您的类或方法命名为必须易于理解,即使以您的名义包含 10 个单词。这是我的目标风格)。
public final class RateLimiterUtils {

   public static BucketConfiguration rateLimiterAnnotationsToBucketConfiguration(List<RateLimiter> rateLimiters) {
       ConfigurationBuilder configBuilder = Bucket4j.configurationBuilder();
       rateLimiters.stream().forEach(limiter -> configBuilder.addLimit(buildBandwidth(limiter)));
       return configBuilder.build();

   }

   public static Optional<List<RateLimiter>> getRateLimiters(HandlerMethod handlerMethod) {
       RateLimiters rateLimitersAnnotation = handlerMethod.getMethodAnnotation(RateLimiters.class);

       if(rateLimitersAnnotation != null) {
           return Optional.of(Arrays.asList(rateLimitersAnnotation.value()));
       }

       RateLimiter rateLimiterAnnotation = handlerMethod.getMethodAnnotation(RateLimiter.class);
       if(rateLimiterAnnotation != null) {
           return Optional.of(Arrays.asList(rateLimiterAnnotation));
       }
       return Optional.empty();
   }

   private static final Bandwidth buildBandwidth(RateLimiter rateLimiter) {

       TimeUnit timeUnit = rateLimiter.timeUnit();
       long timeValue = rateLimiter.timeValue();
       long restriction = rateLimiter.restriction();

       if (TimeUnit.MINUTES.equals(timeUnit)) {
           return Bandwidth.simple(restriction, Duration.ofMinutes(timeValue));
       } else if (TimeUnit.HOURS.equals(timeUnit)) {
           return Bandwidth.simple(restriction, Duration.ofHours(timeValue));
       } else {
           return Bandwidth.simple(5000, Duration.ofHours(1));
       }
   }
}
还有一件事; 我们需要在扩展自 WebMvcConfigurerAdapter 的 Context 中注册我们的自定义拦截器:
import org.springframework.context.annotation.Configuration;
import org.springframework.web.servlet.config.annotation.InterceptorRegistry;
import org.springframework.web.servlet.config.annotation.WebMvcConfigurerAdapter;

@Configuration
public class ContextConfig extends WebMvcConfigurerAdapter {

   @Override
   public void addInterceptors(InterceptorRegistry registry) {
       registry.addInterceptor(new RateLimiterAnnotationHandlerInterceptorAdapter());
   }
}
现在,为了测试我们的机制,我们将创建 ExampleController 并在控制器的方法上方设置 RateLimiter 以检查它是否正常工作:
import com.nibado.example.customargumentspring.component.RateLimiter;
import com.nibado.example.customargumentspring.component.RateLimiters;
import com.nibado.example.customargumentspring.component.TimeUnit;
import org.springframework.web.bind.annotation.GetMapping;
import org.springframework.web.bind.annotation.PathVariable;
import org.springframework.web.bind.annotation.RestController;

@RestController
public class ExampleController {

   @RateLimiters({@RateLimiter(timeUnit = TimeUnit.MINUTES, timeValue = 1, restriction = 2), @RateLimiter(timeUnit = TimeUnit.HOURS, timeValue = 1, restriction = 5)})
   @GetMapping("/example/{id}")
   public String example(@PathVariable("id") String id) {
       return "ok";
   }
}
在@RateLimiters 中,我们设置了两个限制:
-
@RateLimiter(timeUnit = TimeUnit.MINUTES, timeValue = 1,restriction = 2) — 每分钟不超过 2 个请求。
-
@RateLimiter(timeUnit = TimeUnit.HOURS, timeValue = 1,restriction = 5) — 每小时不超过 5 个请求。
这只是 Bucket4j 库的一小部分。如果你觉得这个库不错的话,可以去学习更多API。
PS:防止找不到本篇文章,可以收藏点赞,方便翻阅查找哦。
往期推荐